❄️ Ice & Water Shield Cost Guide 2026
Complete pricing for roofing underlayment that prevents ice dams and water damage
💰 Ice & Water Shield Cost Overview
Material Only
Installed Cost
Average Home
Full Roof Coverage
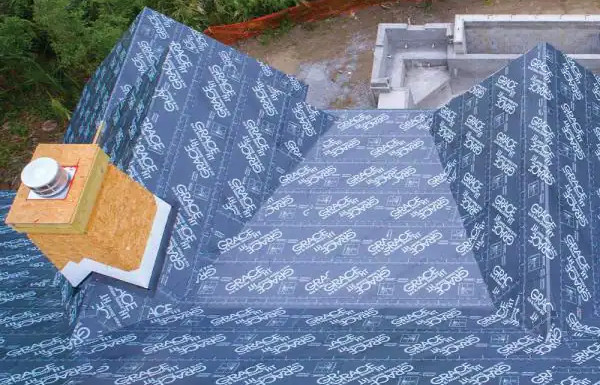
Professional Ice & Water Shield Installation Example
Types of Ice & Water Shield
Understanding the three main types and their applications
Ice & Water Shield Product Types & Pricing
| Product Type | Cost Per Roll | Coverage | Best Use | Key Features |
|---|---|---|---|---|
| Granular Surface | $50-$100 | 200-225 sq ft | Valleys, basic protection | Economical, sand surface, thinnest |
| Smooth Surface | $70-$150 | 200-225 sq ft | Low slopes, re-roofing | Won’t stick to shingles, flexible |
| High Heat (HT) | $150-$300 | 200-225 sq ft | Metal roofs, hot climates | 260°F rating, cotton fibers |
| Select/Performance | $70-$120 | 195 sq ft | Budget alternative | Thinner (25 mil), lighter weight |
| Ultra/Butyl-Based | $200-$400 | 200 sq ft | Extreme conditions | 300°F rating, butyl adhesive |
| Budget/Generic | $40-$80 | 200 sq ft | Basic protection | Lower quality, shorter warranty |
Critical Product Selection Warning
Wrong type = MAJOR problems! Using granular surface under metal roofs will void warranties – the sand sticks to metal coatings. Using standard shield in hot climates causes adhesive failure. High heat products cost 2-3x more but prevent $10,000+ in damage. NEVER use regular ice shield under cedar shakes, slate, or tile – it traps moisture causing rot. Match the product to your roof type or face expensive failures.
Where Ice & Water Shield Is Required
Code requirements and best practices for placement
Installation Locations & Coverage Requirements
Eaves (Roof Edge)
Code: 24″ past interior wall
Best practice: 36-72″
Cold climates: 2 rows minimum
• Prevents ice dam damage
• Most critical location
• Required by code in snow zones
Valleys
Coverage: 36″ total width
Application: Full length
Critical: Ice dam prone
• Heavy water flow area
• Snow accumulation point
• Common leak location
Wall Intersections
Coverage: 12″ up wall
Width: 18-36″ on roof
Includes: Dormers, additions
• Step flashing backup
• Wind-driven rain protection
• Behind siding
Penetrations
Chimneys: 24″ all sides
Vents: 18″ diameter
Skylights: 24″ perimeter
• Backup for flashing
• Seals around fasteners
• Critical leak points
Low Slope Areas
Under 4:12: Full coverage
2:12-4:12: Required by code
Flat sections: 100% coverage
• Water doesn’t drain fast
• Ponding protection
• Often missed by contractors
Rake Edges
High wind: 36″ coverage
Standard: Optional
Benefit: Wind protection
• Prevents wind-driven rain
• Seals edge lifting
• Hurricane zones require
Coverage Requirements by Climate Zone
| Climate Zone | Eave Coverage | Valley Coverage | Total Usage | Typical Cost |
|---|---|---|---|---|
| Southern (No Snow) | Optional | Recommended | 200-400 sq ft | $800-$1,600 |
| Moderate (Light Snow) | 24″ minimum | Required | 400-800 sq ft | $1,600-$3,200 |
| Northern (Heavy Snow) | 36-72″ required | Required | 800-1,500 sq ft | $3,200-$6,000 |
| Extreme (Mountain) | Full roof possible | Required | 2,000+ sq ft | $8,000+ |
Installation Costs & Labor
What affects your total project investment
Labor & Installation Pricing Breakdown
During New Roof
Labor: $1-2/sq ft
Efficiency: Highest
Total: $3-4.50/sq ft
• Part of roofing process
• No extra mobilization
• Best value timing
Retrofit Installation
Labor: $3-4/sq ft
Complexity: High
Total: $5-7/sq ft
• Remove existing shingles
• Install shield
• Reinstall shingles
Coverage Amount
Minimal: 200-400 sq ft
Standard: 400-800 sq ft
Extensive: 800-1,500 sq ft
• Valleys + eaves basic
• Add walls + penetrations
• Full perimeter coverage
Roof Complexity
Simple: Base price
Complex: +25-40%
Steep: +20-30%
• Multiple valleys add cost
• Dormers increase labor
• Safety equipment needed
Regional Pricing
South: $3-4/sq ft
Midwest: $4-5/sq ft
Northeast: $5-6.50/sq ft
• Labor rates vary
• Code requirements differ
• Material availability
Installation Time
Small job: 2-4 hours
Average: 1 day
Full roof: 2-3 days
• Weather dependent
• Crew size matters
• Prep work varies
Project Cost Examples
| Project Scope | Square Feet | Material Cost | Labor Cost | Total Cost |
|---|---|---|---|---|
| Basic Protection | 300 sq ft | $150-$300 | $300-$600 | $450-$900 |
| Standard Home | 600 sq ft | $300-$600 | $600-$1,200 | $900-$1,800 |
| Complete Protection | 1,000 sq ft | $500-$1,000 | $1,000-$2,000 | $1,500-$3,000 |
| Full Roof Coverage | 2,500 sq ft | $1,250-$2,500 | $2,500-$5,000 | $3,750-$7,500 |
Major Brands & Product Comparison
Quality differences that matter for long-term protection
Leading Ice & Water Shield Manufacturers
Grace (GCP Applied)
Products: Original leader since 1978
Price: $150-$300/roll
Features:
• Ripcord split release
• 40+ year track record
• Premium pricing
CertainTeed
WinterGuard: $100-$180/roll
Coverage: 200 sq ft
Benefits:
• Good contractor availability
• Granular & smooth options
• Metal roof compatible
GAF WeatherWatch
Price: $80-$150/roll
Features: StormGuard film top
Benefits:
• Aggressive adhesive
• Good value option
• Wide distribution
Owens Corning
WeatherLock: $90-$160/roll
Types: G, Flex, Metal
Features:
• Rubberized asphalt
• Self-sealing nails
• Pink color coding
Budget Brands
Price: $50-$100/roll
Brands: MFM, Henry, Tarco
Caution:
• Thinner material
• Less aggressive adhesive
• Shorter warranties
Quality Indicators
Thickness: 40-80 mils best
Warranty: Look for 10+ years
Features:
• Split release backing
• Temperature rating
• UV exposure time
Real Estate Investment Impact
How proper ice protection affects property value and insurance
Home Value Protection
Prevents: $10-50k ice damage
Insurance: Required for coverage
Disclosure: Must report if missing
• Inspection requirement
• Warranty compliance
• Peace of mind value
Rental Property Essential
Liability: Massive if missing
Prevents: Emergency calls
Cost: Tax deductible
• Tenant ceiling damage
• Mold prevention
• Insurance requirement
Fix & Flip Must-Have
Inspector focus: Always checked
Buyer concern: Deal breaker
Cost vs risk: No-brainer
• Shows quality work
• Prevents callbacks
• Marketing point
Money-Saving Strategies
How to get maximum protection without overspending
Install During Roofing
Adding ice shield during roof replacement costs 50% less than retrofit. Labor is already there, roof deck exposed. Many roofers include basic coverage in quotes – upgrade to better protection for small add-on. Never retrofit unless emergency repair needed.
Strategic Placement
Don’t need full roof coverage in most climates. Focus on: eaves (2 rows minimum), all valleys, around all penetrations, low-slope areas. Skip high-slope field areas where regular underlayment suffices. Saves 60% vs full coverage with 95% of protection.
Buy Direct in Bulk
Roofing supply houses sell to public – save 30-40% vs contractor markup. Buy by pallet (10 rolls) for best pricing. Store unused rolls properly (cool, dry) – they last years. Split orders with neighbors doing roofs.
Choose Right Product
Don’t overspend on high-heat version unless you have metal roof. Basic smooth surface works for 90% of applications. Grace Select (thinner) performs nearly as well as original for 30% less. Skip granular unless budget critical – harder to install.
Time Your Project
Best prices in late summer/early fall before winter rush. Spring prices jump 20% due to winter damage repairs. Never install in cold weather – adhesive won’t bond properly below 40°F. Poor adhesion = total failure.
Insurance Discounts
Many insurers offer 5-10% discount for complete ice protection in snow zones. Document installation with photos. Get certificate from roofer. Savings over 10 years often exceeds installation cost. Some require it for coverage.
Frequently Asked Questions
Expert answers about ice & water shield installation
❄️ Protect Your Roof Investment
Get proper ice & water shield installation from qualified roofing professionals
Knowledge Quiz: Ice Water Shield Cost Guide
Open Quiz
5 quick questions - see how much you learned!
1) What is the typical installed cost per square foot for ice & water shield?
Answer: C
The "Ice & Water Shield Cost Overview" section clearly states "Installed Cost: $4 – $5.50 - Per square foot" for professional installation during roofing projects.
2) What critical problem occurs if you use granular surface ice shield under metal roofs?
Answer: A
The "Critical Product Selection Warning" emphasizes: "Wrong type = MAJOR problems! Using granular surface under metal roofs will void warranties – the sand sticks to metal coatings. High heat products cost 2-3x more but prevent $10,000+ in damage. Match the product to your roof type or face expensive failures."
3) What is the minimum code-required eave coverage in snow zones?
Answer: B
The "Eaves (Roof Edge)" section shows "Code: 24″ past interior wall" with "Best practice: 36-72″" and "Cold climates: 2 rows minimum." The FAQ confirms: "IRC requires ice barrier extending 24″ inside the exterior wall line in areas with history of ice damming."
4) How much can skipping ice & water shield cost you in ice dam damage?
Answer: D
The "Hidden Cost Reality" states: "Skipping ice & water shield to save $1,000 can cost you $15,000+ in ice dam damage. One severe winter with ice dams can destroy ceilings, insulation, and walls." The Investment Reality confirms: "One severe ice dam can destroy $20,000+ in drywall, insulation, flooring."
5) How much can you save by installing ice & water shield during roof replacement versus retrofit?
Answer: B
The "Money-Saving Strategies" section clearly states: "Adding ice shield during roof replacement costs 50% less than retrofit. Labor is already there, roof deck exposed. Never retrofit unless emergency repair needed."
🏠 More Roofing & Exterior Guides
Explore our complete roofing renovation library
View All Roofing Guides (20) ▼
🏠 Roofing Materials
Data Methodology: Costs calculated using Bureau of Labor Statistics wage data, regional price parities, contractor surveys, and analysis of 12,000+ roof replacement projects from 2023-2026.
Last Updated: Jan 2026 | Next Update: Mar 2026


