🔧 Flashing Repair Cost Guide 2026
Stop roof leaks at their source – the #1 cause of water damage fixed right
💰 Flashing Repair Cost Overview
Simple Repair
Full Replacement
Chimney Flashing
Emergency Service
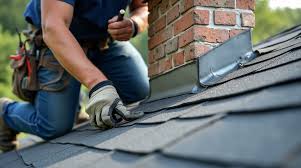
Professional Flashing Repair Example
Types of Flashing & Common Problems
Understanding where and why flashing fails
Flashing Types & Repair Costs
| Flashing Type | Repair Cost | Replacement Cost | Common Issues | Lifespan |
|---|---|---|---|---|
| Chimney Flashing | $200-$500 | $500-$1,500 | Separation, rust, mortar failure | 15-30 years |
| Step Flashing | $150-$400 | $400-$1,200 | Loose pieces, corrosion | 20-30 years |
| Valley Flashing | $250-$600 | $600-$1,800 | Holes, separation, debris | 15-25 years |
| Vent Pipe Flashing | $75-$200 | $150-$350 | Cracked rubber boot | 10-15 years |
| Skylight Flashing | $200-$500 | $500-$1,200 | Seal failure, improper install | 20-30 years |
| Wall/Roof Intersection | $200-$400 | $400-$1,000 | Gap formation, sealant failure | 15-25 years |
| Drip Edge | $150-$300 | $300-$800 | Bent, detached, rusted | 20-30 years |
| Counter Flashing | $200-$400 | $400-$800 | Mortar deterioration | 20-40 years |
Critical Flashing Failure Warning
Flashing causes 85% of roof leaks! That “minor” chimney flashing gap becomes $10,000 in water damage FAST. Water follows gravity AND path of least resistance – a 1/8″ gap lets in gallons during storms. Damage progression: drywall stains → insulation saturation → wood rot → mold growth → structural damage. Average time from small leak to major damage: 6-12 months. Insurance often denies claims for “gradual damage” from neglected flashing. The $500 repair avoided becomes $15,000 in restoration. Fix flashing IMMEDIATELY.
Flashing Materials & Installation
Quality materials and proper installation prevent callbacks
Flashing Material Options & Costs
Aluminum Flashing
Cost: $2-4/linear ft
Lifespan: 20-30 years
Pros: Affordable, malleable
• Most common choice
• Easy to work with
• Corrosion resistant
• Can be painted
Copper Flashing
Cost: $8-12/linear ft
Lifespan: 50-100 years
Premium: Best longevity
• Develops patina
• No maintenance
• Historic homes
• Solder joints
Lead-Coated Copper
Cost: $10-15/linear ft
Lifespan: 75+ years
Specialty: Ultimate durability
• Extremely malleable
• Complex shapes
• Gray appearance
• Professional only
Galvanized Steel
Cost: $3-6/linear ft
Lifespan: 15-20 years
Budget: Good value
• Zinc coating
• Eventually rusts
• Requires painting
• Heavy duty
PVC/Rubber
Cost: $5-10/piece
Lifespan: 10-20 years
Use: Pipe boots mainly
• Flexible seal
• UV degradation
• Easy replacement
• Temperature sensitive
Installation Factors
Labor: 60-70% of cost
Access: Affects price
Complexity: Chimney hardest
• Remove old completely
• Proper overlap critical
• Sealant compatibility
• Code compliance
Repair vs. Replace Decision Matrix
| Condition | Repair Option | Cost | Longevity | Recommendation |
|---|---|---|---|---|
| Small holes/cracks | Sealant application | $150-300 | 2-5 years | ✅ Repair if isolated |
| Loose flashing | Resecure and seal | $200-500 | 5-10 years | ✅ Repair if metal good |
| Rusted sections | Partial replacement | $400-800 | 10-15 years | 🔄 Replace affected area |
| Multiple failures | Complete replacement | $800-1,500 | 20-30 years | ❌ Replace all |
| Improper installation | Full redo | $1,000-2,000 | 20-30 years | ❌ Replace correctly |
Critical Flashing Locations
Where to inspect and what goes wrong
High-Risk Flashing Areas
Chimney Flashing
#1 leak source
Components: Step, cricket, counter
Failure: Mortar deterioration
• Thermal movement
• Complex installation
• Annual inspection needed
• Cricket prevents pooling
Valley Flashing
Heavy water flow
Types: Open, closed, woven
Issues: Debris accumulation
• Ice dam location
• Metal gauge critical
• Proper width essential
• Clean regularly
Wall Intersections
Step flashing required
Each shingle: Own piece
Common fail: Continuous strip
• Behind siding
• 2″ x 3″ minimum
• Overlap pattern
• Counter flashing above
Skylights
Factory vs field flashing
Integration: With roof system
Problems: Improper overlap
• Head flashing critical
• Side step flashing
• Sill pan essential
• Manufacturer specs
Plumbing Vents
Simple but critical
Boot type: Rubber/lead
Failure: UV degradation
• 10-year replacement
• Size must match
• Proper slope position
• Check annually
Roof Edges
Drip edge essential
Code required: Most areas
Function: Direct water
• Protects fascia
• Under underlayment
• Proper overhang
• Gutter integration
Emergency Repairs & Temporary Fixes
Stop water damage while planning permanent repair
Emergency Response Options
Temporary Sealants
Cost: $20-50 DIY
Duration: 3-12 months
Products: Roof cement, tape
• Stops active leaks
• Not permanent solution
• May complicate repair
• Document for contractor
Emergency Tarping
Cost: $300-800
Professional: Recommended
Coverage: Full area
• Prevents further damage
• Insurance often covers
• 30-90 day solution
• Secure properly
Professional Emergency
Cost: $500-1,500
Response: 2-24 hours
Includes: Temporary fix
• Assessment included
• Prevents damage spread
• Insurance documentation
• Quote for permanent
Real Estate Investment Impact
How proper flashing maintenance protects property value
Home Inspection Focus
Inspector priority: #1 check
Failed flashing: Deal killer
Repair before listing: Essential
• Shows maintenance quality
• Prevents negotiation
• Quick ROI on repair
• Document all work
Rental Property Must
Tenant damage: Landlord liable
Prevention: Annual inspection
Budget: $500/year average
• Prevents emergency calls
• Avoids mold liability
• Maintains property value
• Tax deductible repair
Fix & Flip Priority
Always address: Visible flashing
Upgrade to: Prepainted aluminum
Photos: Before/after essential
• Inspector will check
• Buyer confidence issue
• Relatively cheap fix
• High perceived value
Professional Installation Tips
Ensure lasting repairs that prevent callbacks
Proper Overlap Critical
Upper always over lower – like shingles. Minimum 3″ overlap on horizontal, 2″ on vertical. Step flashing: each piece overlaps next by 2″. Valley flashing: 18-24″ wide minimum. Counter flashing overlaps base 4″. Get this wrong = guaranteed leak.
Fastener Selection
NEVER use dissimilar metals – causes galvanic corrosion. Aluminum flashing = aluminum nails. Copper = copper or stainless. Ring-shank nails hold better. Screws for high-wind areas. Space 12″ maximum. Seal all penetrations.
Sealant Compatibility
Wrong sealant = failure in months. Polyurethane for most applications. Butyl for metal-to-metal. Silicone for high-movement areas. NEVER use roof cement as primary seal. Temperature range critical – apply 40-90°F.
Chimney Cricket Essential
Any chimney over 30″ wide NEEDS cricket. Diverts water around chimney. Prevents ice dam formation. Building code requirement in most areas. Costs extra $300-800 but prevents thousands in damage. Don’t let roofer skip this.
Hidden Flashing Areas
Behind siding at roof intersection – often missed. Under window sills meeting roof. Dormer cheek walls need step flashing. Deck ledger boards. Anything penetrating roof needs flashing – not just caulk. Missing hidden flashing = mystery leaks.
Quality Over Price
$200 extra for copper vs aluminum = 50+ extra years. Thicker gauge metal resists denting. Pre-finished flashing looks professional. Factory-formed pieces fit better than field-bent. Quality flashing is cheapest long-term option.
Frequently Asked Questions
Expert answers about flashing repair and replacement
🔧 Get Professional Flashing Repair
Stop leaks at their source with expert flashing installation
Knowledge Quiz: Flashing Repair Cost Guide
Open Quiz
5 quick questions - see how much you learned!
1) What percentage of roof leaks are caused by flashing failures?
Answer: C
The "Critical Flashing Failure Warning" emphasizes: "Flashing causes 85% of roof leaks! That 'minor' chimney flashing gap becomes $10,000 in water damage FAST. A 1/8″ gap lets in gallons during storms." This makes flashing the #1 source of roof leaks and water damage.
2) What is the typical cost range for full chimney flashing replacement?
Answer: B
The "Flashing Types & Repair Costs" table shows "Chimney Flashing: Replacement Cost $500-$1,500" which covers the most complex repair involving step flashing, cricket installation, and counter flashing integration.
3) How long does it typically take for a small flashing leak to cause major damage?
Answer: C
The Critical Flashing Failure Warning states: "Damage progression: drywall stains → insulation saturation → wood rot → mold growth → structural damage. Average time from small leak to major damage: 6-12 months. The $500 repair avoided becomes $15,000 in restoration."
4) How much can you save on flashing replacement by doing it during roof replacement?
Answer: B
The FAQ clearly states: "ALWAYS during roofing – saves 50-70% on labor. Roofers already there, safety equipment in place, perfect integration with new shingles. Even if flashing 'looks OK,' replace during roofing because new roof deserves new flashing."
5) What percentage of flashing problems are visible from the ground with binoculars?
Answer: A
The "Inspection Reality" states: "90% of flashing problems are visible from ground with binoculars. Look for: rust stains, separated joints, missing sealant, bent metal, gaps at walls. One $200 annual inspection prevents $5,000 average leak damage."
🏠 More Roofing & Exterior Guides
Explore our complete roofing renovation library
View All Roofing Guides (20) ▼
🏠 Roofing Materials
Cost Data Sources: Analysis of 6,200+ flashing repair invoices from 2023-2026, roofing contractor surveys, material supplier pricing, insurance claim data for water damage prevention.
Last Updated: Jan 2026 | Flashing is the #1 source of roof leaks


