🔧 Additional Roofing Components Cost Guide 2026
Essential components that complete and protect your roofing system
💰 Component Cost Overview
Ridge Vents
Flashing Work
Drip Edge
Underlayment
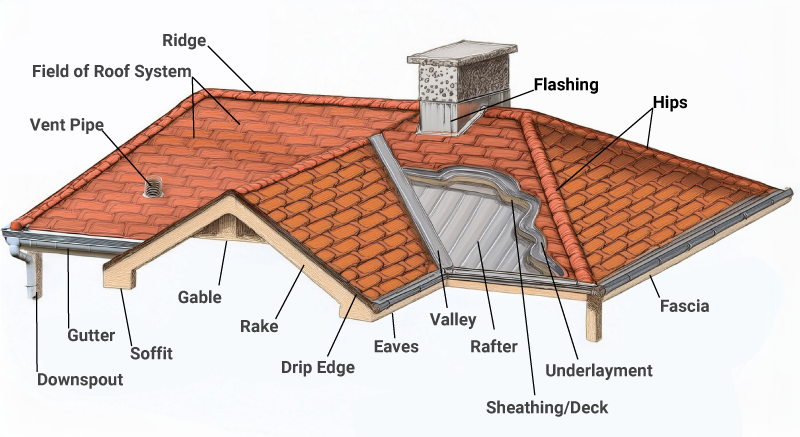
Professional Roofing Components Installation Example
Ventilation Systems & Costs
Critical for roof longevity and energy efficiency
Complete Ventilation Options
| Ventilation Type | Material Cost | Installed Cost | Coverage Area | Lifespan |
|---|---|---|---|---|
| Ridge Vent (Shingle-Over) | $2 – $3/ft | $5 – $10/ft | 300 CFM/ft | Life of roof |
| Ridge Vent (Aluminum) | $3 – $5/ft | $8 – $12/ft | 350 CFM/ft | 20-30 years |
| Box/Turtle Vents | $10 – $25 each | $75 – $150 each | 50-60 sq ft | 15-20 years |
| Turbine Vents | $20 – $75 each | $100 – $250 each | 100-300 sq ft | 15-25 years |
| Power Vents | $100 – $300 each | $300 – $600 each | 1,200 CFM | 10-15 years |
| Solar Powered Vents | $200 – $500 each | $400 – $800 each | 800-1,200 CFM | 15-20 years |
| Soffit Vents (Continuous) | $3 – $6/ft | $8 – $15/ft | 10 sq in/ft | Life of soffit |
| Gable Vents | $25 – $75 each | $150 – $300 each | 150-300 sq ft | 20-30 years |
Critical Ventilation Balance
Must have equal intake and exhaust! Installing ridge vents without adequate soffit vents creates negative pressure, pulling conditioned air from your home and increasing energy bills. The 1:150 rule requires 1 sq ft of ventilation per 150 sq ft of attic space, split 50/50 between intake (soffit) and exhaust (ridge). Improper ventilation voids shingle warranties and causes premature failure.
Flashing Components & Protection
The first line of defense against water infiltration
Flashing Types and Applications
Step Flashing
Cost: $10-20/piece
Installation: $200-400/wall
Material: Aluminum or copper
• Critical at wall intersections
• 4″ x 4″ minimum size
• Overlaps shingle rows
Valley Flashing
Cost: $15-30/ft
Installation: $50-100/ft
Options: Open or closed
• W-style or straight
• Ice shield underneath
• 24″ wide minimum
Chimney Flashing
Cost: $300-800 complete
Components: Step + cricket
Material: Lead-coated copper best
• Cricket for 30″+ chimneys
• Counter-flashing required
• Most complex flashing
Skylight Flashing
Cost: $150-400 per skylight
Type: Usually kit included
Critical: Proper integration
• Head flashing diverts water
• Side/bottom step flashed
• Ice shield 6″ beyond
Pipe Boot Flashing
Cost: $5-50 per boot
Installation: $75-150 each
Types: Rubber, lead, or retrofit
• Plumbing vent standard
• HVAC penetrations
• Replace every re-roof
Kickout Flashing
Cost: $20-50 each
Critical: Prevents siding rot
Code: Required most areas
• Diverts water from walls
• Often missing on older homes
• Major damage preventer
Flashing Material Comparison
| Material | Cost/sq ft | Lifespan | Best Applications | Pros/Cons |
|---|---|---|---|---|
| Aluminum | $2 – $4 | 20-30 years | General purpose | Affordable, paintable / Can corrode |
| Copper | $8 – $12 | 50-100 years | Premium homes | Beautiful patina / Expensive |
| Lead-Coated Copper | $10 – $15 | 75-100 years | Chimneys, complex | Most durable / Very expensive |
| Galvanized Steel | $3 – $5 | 15-25 years | Budget applications | Strong / Will rust eventually |
| PVC/Rubber | $1 – $3 | 10-20 years | Pipe boots only | Flexible / UV degradation |
Underlayment & Moisture Barriers
Your roof’s secondary defense system
Underlayment Options & Costs
Felt Paper (#15/#30)
Cost: $15-30/roll
Coverage: 200-400 sq ft
Use: Basic protection
• Traditional option
• Tears easily
• Minimum code requirement
Synthetic Underlayment
Cost: $30-50/roll
Coverage: 1,000 sq ft
Benefits: Won’t tear, lighter
• 6-month UV exposure OK
• Slip-resistant surface
• Industry standard now
Ice & Water Shield
Cost: $70-100/roll
Coverage: 200 sq ft
Required: Valleys, eaves
• Self-adhering membrane
• Seals around nails
• Code required cold climates
High-Temp Underlayment
Cost: $80-120/roll
For: Metal, tile roofs
Rating: 240°F+ resistance
• Prevents sticking
• Breathable options
• Required under metal
Peel & Stick Base
Cost: $100-150/roll
Use: Entire roof option
Benefit: Waterproof backup
• Premium protection
• Low-slope applications
• 50-year systems
Cedar Breather
Cost: $0.50-1/sq ft
For: Wood shingles/shakes
Purpose: Ventilation mat
• Prevents rot
• Required for warranty
• Extends wood life 50%
Ice & Water Shield Requirements by Climate
| Climate Zone | Code Requirement | Recommended Coverage | Cost Impact |
|---|---|---|---|
| Northern (Heavy Snow) | 24″ inside wall line | First 6 feet + valleys | +$500-1,000 |
| Moderate Winter | Eaves only | 3 feet + valleys | +$300-600 |
| Southern (No Freeze) | Valleys only | Valleys + penetrations | +$200-400 |
| High Wind (Hurricane) | May require full coverage | Entire roof recommended | +$1,500-3,000 |
Edge Components & Accessories
Finishing touches that prevent major problems
Edge Protection & Trim Components
Drip Edge
Cost: $3-8/linear ft
Code: Required most areas
Types: L-style, T-style
• Directs water to gutters
• Protects fascia board
• Install before underlayment
Rake Edge
Cost: $5-10/linear ft
Purpose: Gable end protection
Width: 1.5″-2.5″ typical
• Prevents wind uplift
• Covers exposed edges
• Color-matched available
Gutter Apron
Cost: $4-8/linear ft
When: Re-roofing with gutters
Benefit: Behind gutter protection
• Prevents rot behind gutters
• Slides under shingles
• Worth the investment
Starter Strip
Cost: $25-45/bundle
Coverage: 100-120 linear ft
Purpose: Seal first row
• Adhesive strip bonds
• Prevents blow-offs
• Required for warranty
Hip & Ridge Caps
Cost: $35-60/bundle
Coverage: 30-35 linear ft
Options: Match or accent
• Pre-bent available
• High-profile options
• Impact resistant types
Snow Guards
Cost: $5-15 per guard
Spacing: 2-3 ft typical
Types: Pad or fence style
• Prevents avalanches
• Multiple rows needed
• Color-matched options
Component Investment Strategy
Where to spend and where to save on roofing components
Premium Upgrades Worth It
Ridge vents: Superior ventilation
Synthetic underlayment: Cheap insurance
Ice shield: Prevent major damage
• Copper valleys last forever
• These prevent callbacks
• Pay once, protect always
Where to Save Money
Box vents: If ridge won’t work
Aluminum flashing: vs copper
Standard drip edge: Works fine
• Skip decorative elements
• Basic starter strip OK
• Standard color hip/ridge
ROI Considerations
Proper ventilation: Extends life 5-10 years
Quality flashing: Prevents $1000s damage
Good underlayment: Insurance if shingles fail
• Components = 10-15% of job
• But prevent 90% of problems
• Never cut corners here
Smart Component Strategies
Professional tips for maximum protection
Bundle Component Upgrades
Negotiate package deals for multiple upgrades. Contractors prefer selling complete systems. Get ridge vent + synthetic underlayment + ice shield as package for 10-15% discount. Labor’s already there, materials are cheap insurance.
Upgrade During Re-Roofing Only
Adding ventilation or upgrading flashing later costs 3x more. While roof is exposed, add everything needed. $500 in upgrades during installation prevents $2,000 repairs later. This is your only chance for 20-30 years.
Match Components to Shingle Grade
50-year shingles deserve 50-year components. Don’t put premium shingles over basic felt paper. Conversely, basic 20-year shingles don’t need copper flashing. Match component quality to primary material lifespan.
Climate-Specific Upgrades
Hot climates: Extra ventilation + white components. Cold climates: Full ice shield + snow guards. Windy areas: Enhanced starter strips + extra nailing. Spend money on what your climate demands, skip what it doesn’t.
Inspect Before Covering
Take photos of ice shield installation, valley flashing, and all penetration boots before shingles cover them. Documents proper installation for warranty claims. Catches contractor shortcuts. Worth 30 minutes of inspection time.
Copper for Trouble Spots
Use copper flashing only where it matters: valleys, wall intersections, chimneys. Aluminum everywhere else saves 60% on flashing costs. Strategic copper placement gets longevity benefits without breaking budget.
Frequently Asked Questions
Critical component questions answered
🔧 Need Quality Roofing Components?
Find contractors who use premium materials and proper installation
Knowledge Quiz: Additional Roofing Components Cost Guide
Open Quiz
5 quick questions - see how much you learned!
1) What is the critical ventilation balance rule for attic spaces?
Answer: B
The "Critical Ventilation Balance" warning emphasizes: "The 1:150 rule requires 1 sq ft of ventilation per 150 sq ft of attic space, split 50/50 between intake (soffit) and exhaust (ridge). Improper ventilation voids shingle warranties and causes premature failure."
2) What percentage of total roofing project cost do components typically represent?
Answer: C
The Investment Rule clearly states: "Roofing components typically represent only 10-15% of total project cost but prevent 90% of future problems. Spending an extra $500-1,000 on quality ventilation, ice shield, and synthetic underlayment can add 5-10 years to roof life."
3) How much can ridge vents reduce summer attic temperatures?
Answer: B
The FAQ clearly states: "The $300-500 investment in ridge venting can reduce summer attic temperatures by 20-40°F, extending shingle life significantly." Ridge vents provide superior uniform attic ventilation compared to gable vents.
4) Is drip edge required by building code in most areas?
Answer: A
The FAQ emphasizes: "Drip edge is code-required in most areas and critical for roof longevity. It costs only $3-8 per linear foot but prevents water from wicking back under shingles and rotting fascia boards. Always insist on drip edge installation."
5) Should old pipe boots be reused during re-roofing to save money?
Answer: B
The FAQ is clear: "Every penetration needs a new boot during re-roofing – typically 3-6 per home. Old boots are the #1 source of leaks on aging roofs. Never reuse old boots to save $100 – they'll fail within 5 years."
🏠 More Roofing & Exterior Guides
Explore our complete roofing renovation library
View All Roofing Guides (20) ▼
🏠 Roofing Materials
Last updated: Jan 2026
Sources: National Roofing Contractors Association, GAF Materials, Owens Corning, CertainTeed, Builds and Buys Research Team


