🪨 Rock/Gravel Landscaping Cost Guide 2026
Complete pricing for rock gardens, gravel paths, and decorative stone landscapes
💰 Rock Landscaping Cost Overview
Material Only
Installed Cost
Average Project
Decorative Rock
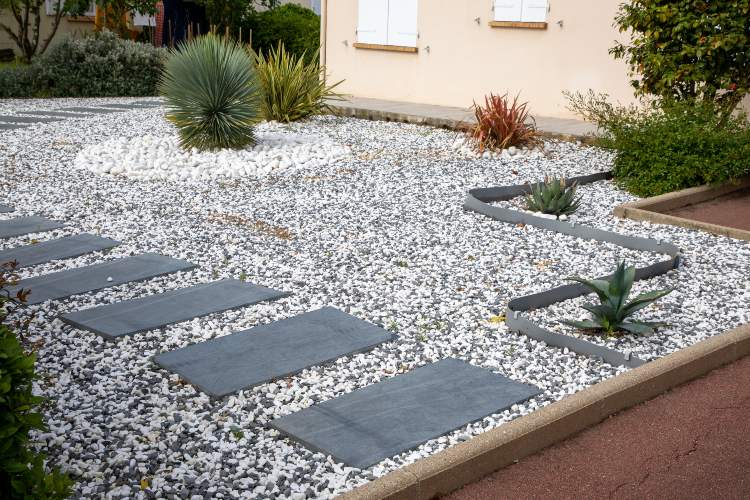
Rock / Gravel Landscaping Example (Fabric + Edging + Decorative Stone)
Rock Types & Complete Installation Costs
Every rock and gravel option with pricing, coverage, and applications
Complete Rock & Gravel Pricing
| Rock Type | Cost/Ton | Cost/Sq Ft | Coverage | Best Uses |
|---|---|---|---|---|
| Pea Gravel | $25 – $50 | $1 – $1.50 | 100 sq ft @ 2″ | Paths, play areas |
| River Rock | $40 – $100 | $1.50 – $3 | 80 sq ft @ 3″ | Decorative beds |
| Decomposed Granite | $20 – $40 | $0.75 – $1.25 | 120 sq ft @ 2″ | Pathways, patios |
| Lava Rock | $80 – $150 | $2 – $4 | 200 sq ft @ 2″ | Lightweight mulch |
| Crushed Stone | $15 – $35 | $0.50 – $1 | 100 sq ft @ 2″ | Base, driveways |
| Beach Pebbles | $150 – $300 | $3 – $6 | 75 sq ft @ 2″ | Zen gardens |
| Marble Chips | $200 – $400 | $4 – $8 | 80 sq ft @ 2″ | Premium accents |
| Flagstone | $150 – $300 | $10 – $25 | 120 sq ft/ton | Stepping stones |
Critical Rock Landscaping Warnings
Weed barrier fabric is NOT optional – weeds grow through rock! Skip fabric and you’ll be pulling weeds forever. Use commercial-grade landscape fabric, not cheap plastic. Calculate depth correctly: 2-3 inches minimum, 4 inches for larger stones. One ton covers less than you think – always order 20% extra. Rock settles 15-20% first year – plan accordingly. Never put rock directly against foundation – creates pest highways and moisture issues. Sharp rocks destroy mower blades – install proper edging. Gravel migrates everywhere without solid borders. Light colored rocks show dirt/algae quickly in shady areas. Dogs hate pea gravel – painful on paws. Rock holds heat – can cook plant roots in summer. Removal is expensive and labor-intensive – choose wisely! Snow removal nightmare on gravel driveways.
Complete Installation & Project Costs
Total investment for different rock landscaping projects
Rock Landscaping Project Breakdown
| Project Type | Size | Material Cost | Labor Cost | Total Cost |
|---|---|---|---|---|
| Small Rock Garden | 200 sq ft | $100 – $300 | $200 – $400 | $300 – $700 |
| Side Yard Path | 100 ft x 3 ft | $150 – $450 | $300 – $600 | $450 – $1,050 |
| Front Yard Beds | 500 sq ft | $250 – $750 | $500 – $1,000 | $750 – $1,750 |
| Complete Xeriscape | 1,500 sq ft | $750 – $2,250 | $1,500 – $3,000 | $2,250 – $5,250 |
| Driveway Border | 200 linear ft | $400 – $800 | $400 – $800 | $800 – $1,600 |
Additional Installation Components
| Component | Cost | Purpose | Necessity |
|---|---|---|---|
| Landscape Fabric | $0.20 – $0.50/sq ft | Weed prevention | Essential |
| Metal Edging | $4 – $8/linear ft | Contains rock | Highly recommended |
| Base Preparation | $1 – $2/sq ft | Level, compact soil | Important for stability |
| Boulder Accents | $100 – $500 each | Focal points | Design enhancement |
| Delivery Fee | $50 – $150 | Bulk materials | Usually required |
| Old Material Removal | $200 – $500 | Clear existing | If replacing mulch |
| Stabilizer Application | $0.50 – $1/sq ft | Prevents shifting | For DG paths |
| Drainage Installation | $5 – $10/linear ft | Prevent washout | Sloped areas |
Factors Affecting Rock Landscaping Costs
What determines your final rock installation price
Major Cost Variables
Delivery Access
Easy access:
• Dump near site
• Bulk delivery
• Standard rates
Limited access:
• Wheelbarrow required
• Bagged material
• +50-100% labor
Rock Selection
Basic options:
• Local quarry stone
• Common sizes
• $20-40/ton
Premium choices:
• Imported stone
• Specific colors
• $100-300/ton
Coverage Depth
Standard (2-3″):
• Adequate coverage
• Normal cost
• Most applications
Deep coverage (4-6″):
• Better weed control
• High-traffic areas
• Double material cost
Site Preparation
Minimal prep:
• Level ground
• No obstacles
• Quick install
Extensive prep:
• Grading needed
• Remove vegetation
• +$1-2/sq ft
Geographic Location
Near quarries:
• Lower material cost
• More options
• Competitive pricing
Remote areas:
• High transport cost
• Limited selection
• +30-50% markup
Design Complexity
Simple spread:
• One rock type
• Basic coverage
• Efficient install
Pattern work:
• Multiple materials
• Artistic layouts
• +40-60% labor
Rock Landscaping Design & Applications
Creating beautiful, functional rock landscapes
Rock Applications by Area
| Application | Best Rock Type | Depth Needed | Special Considerations |
|---|---|---|---|
| Garden Paths | DG, Pea gravel | 2-3 inches | Stabilizer recommended |
| Driveways | Crushed stone, Gravel | 4-6 inches | Compacted base essential |
| Decorative Beds | River rock, Lava rock | 2-4 inches | Fabric barrier crucial |
| Water Features | Beach pebbles, River rock | 3-4 inches | Smooth stones only |
| Desert/Xeriscape | DG, Crushed granite | 2-3 inches | Heat reflection factor |
| Play Areas | Pea gravel, Rubber rock | 6-9 inches | Safety depth required |
| Erosion Control | Rip rap, Large stone | 6-12 inches | Professional design needed |
| Modern Design | White rock, Black lava | 2-3 inches | High contrast borders |
Real Estate Investment Returns
Rock landscaping ROI for different property strategies
Primary Residence
ROI: 60-80% value return
Investment: $1,500-5,000
Benefits:
• Eliminates mowing areas
• Year-round neat appearance
• Water conservation
• 10-15 year lifespan
Rental Property
ROI: Through zero maintenance
Strategy: Replace problem areas
Budget: $800-2,000
Benefits:
• No mowing service needed
• No watering required
• Tenant-proof solution
• One-time investment
Fix & Flip
ROI: 100-150%
Strategy: Problem area solution
Budget: $500-1,500
Impact:
• Covers dead grass areas
• Modern, clean aesthetic
• Low-maintenance selling point
• Appeals to busy buyers
DIY vs Professional Rock Installation
When to spread it yourself vs hiring pros
Installation Method Comparison
DIY Installation
Save: $1-2/sq ft labor
Time: 50-100 sq ft/day
Good for:
• Small areas (<500 sq ft)
• Bagged materials
• Simple spreading
• Fit homeowners
Tools: Wheelbarrow, rake, shovel
Professional Service
Cost: $1-2/sq ft labor
Time: 500-1000 sq ft/day
Includes:
• Equipment for spreading
• Proper base prep
• Fabric installation
• Bulk material handling
• Finished grading
Common DIY Mistakes
• Underestimating weight
• Skipping weed barrier
• Insufficient depth
• No edge containment
• Poor drainage planning
• Wrong rock for purpose
• Mixing incompatible stones
DIY Success Tips
• Order extra – returns difficult
• Rent equipment for big jobs
• Install fabric correctly
• Compact base thoroughly
• Work in sections
• Have rock delivered close
• Recruit helpers
When Pros Essential
• Over 10 tons material
• Steep slopes
• Drainage integration
• Pattern/design work
• Boulder placement
• Limited access areas
Smart Approach
Pro delivery + DIY spread:
• Save on labor
• Bulk pricing benefits
DIY prep + Pro finish:
• Clear area yourself
• Pros handle rock
• Best value option
Money-Saving Strategies
Cut costs without compromising quality
Buy from Quarries Direct
Skip landscape supply markups of 50-100%. Most quarries sell to public with minimum orders. Arrange your own delivery or pickup. Save $20-40 per ton on basic materials.
Share Delivery Costs
Full truckload pricing beats small orders. Coordinate with neighbors doing projects. Split 20-ton delivery 4 ways. Delivery often $100+ – sharing saves significantly.
Construction Site Excess
Builders often have leftover stone/gravel. Check new development sites. Offer to haul away excess. Free or deeply discounted materials. Perfect for base layers.
Strategic Placement
Use premium rock only in visible areas. Basic gravel for under-layers. Mix 70/30 basic/decorative. Creates high-end look for less. Saves 40% on materials.
Calculate Precisely
Over-ordering rock is expensive mistake. Measure carefully, use online calculators. Account for compaction (15%). Order exactly what you need plus 10%. Returns usually not accepted.
Municipal Programs
Many cities offer free recycled concrete/asphalt. Crushed into gravel-sized pieces. Perfect for paths and bases. Check public works departments. Some deliver for small fee.
Frequently Asked Questions
Expert answers about rock and gravel landscaping
🪨 Ready to Transform Your Landscape?
Find qualified rock landscaping installers and suppliers
Knowledge Quiz: Rock Gravel Landscaping Cost Guide
Open Quiz
5 quick questions - see how much you learned!
1) According to the warnings, which installation step is “NOT optional” for rock landscaping?
Answer: B
The guide warns that weed barrier fabric is NOT optional or weeds will grow through rock.
2) In the rock pricing table, which material is listed at $0.50 – $1 per sq ft?
Answer: C
Crushed Stone is shown at $0.50 – $1 per sq ft in the table.
3) Which rock type is listed with coverage of 120 sq ft @ 2"?
Answer: A
The table lists Decomposed Granite as covering 120 sq ft at 2".
4) In the project breakdown, what’s the total cost range for a Complete Xeriscape (1,500 sq ft)?
Answer: D
The guide shows Complete Xeriscape (1,500 sq ft) totaling $2,250 – $5,250.
5) Which component is priced at $0.50 – $1 per sq ft and is specifically used to prevent shifting on DG pathways?
Answer: B
The components table lists Stabilizer Application at $0.50 – $1/sq ft to prevent shifting (especially for DG paths).
6) Which application area recommends 4-6 inches depth and calls out a compacted base as essential?
Answer: C
The applications table recommends 4-6 inches for Driveways and notes a compacted base is essential.
7) The guide’s pro tips say the clean installation order is:
Answer: A
The pro tips explicitly state: Edge first, fabric second, rock last.
🌿 More Landscaping Cost Guides
Explore our complete outdoor improvement library
View All Landscaping Guides (25+) ▼
🌱 Lawn & Turf Services
🌳 Trees & Plants
💧 Water & Irrigation
🎨 Design & Hardscaping
🏗️ Structures & Recreation
Last updated: Jan 2026
Sources: National Stone, Sand & Gravel Association, Decorative Stone Institute, Professional Grounds Management Society, American Society of Landscape Architects, Rock & Gravel Suppliers Association, Builds and Buys Research Team


