Insulation and Drywall Installation 2026: Ensuring Thermal Efficiency and Smooth Walls
Insulation and drywall form the critical thermal and visual envelope of your building. Research shows that proper installation can reduce energy costs by 20-30% and increase property value by up to 6%. This comprehensive guide explores professional installation techniques, material selection, and expert strategies to ensure your walls and ceilings deliver maximum efficiency, comfort, and aesthetic appeal.
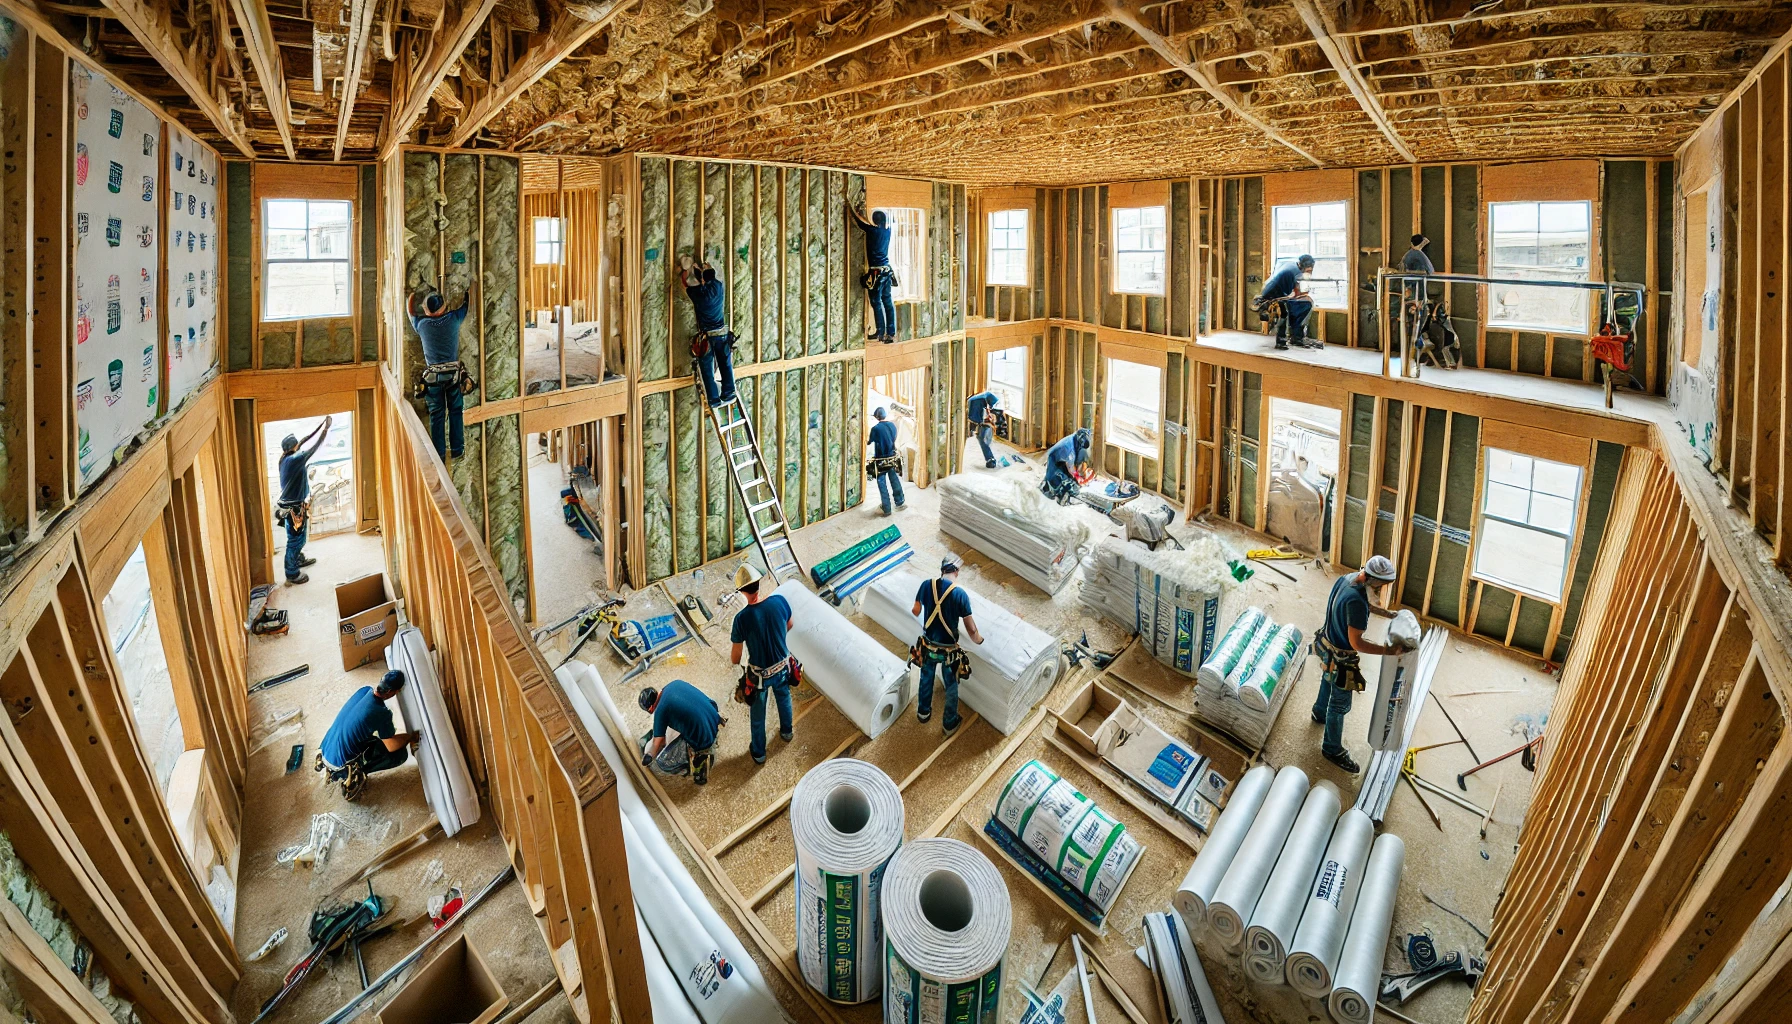
[Image: Professional Insulation and Drywall Installation in Progress]
⚡ Quick Answers: Insulation & Drywall Costs, R-Values & Common Problems (Click for instant answers)
▼📍 See Global-Specific Insulation & Drywall Requirements Critical differences that can save/cost you thousands
▼Key Steps in Insulation and Drywall Installation
These are the critical tasks involved in creating an energy-efficient and aesthetically pleasing interior:
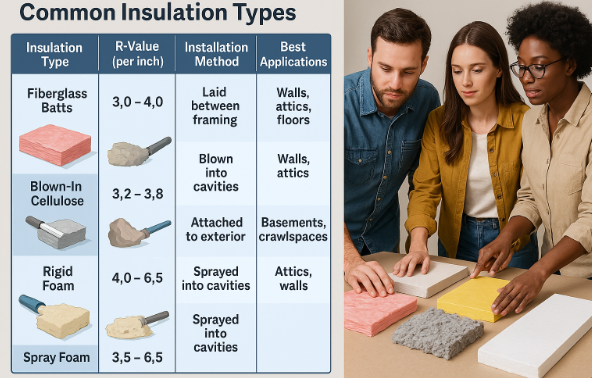
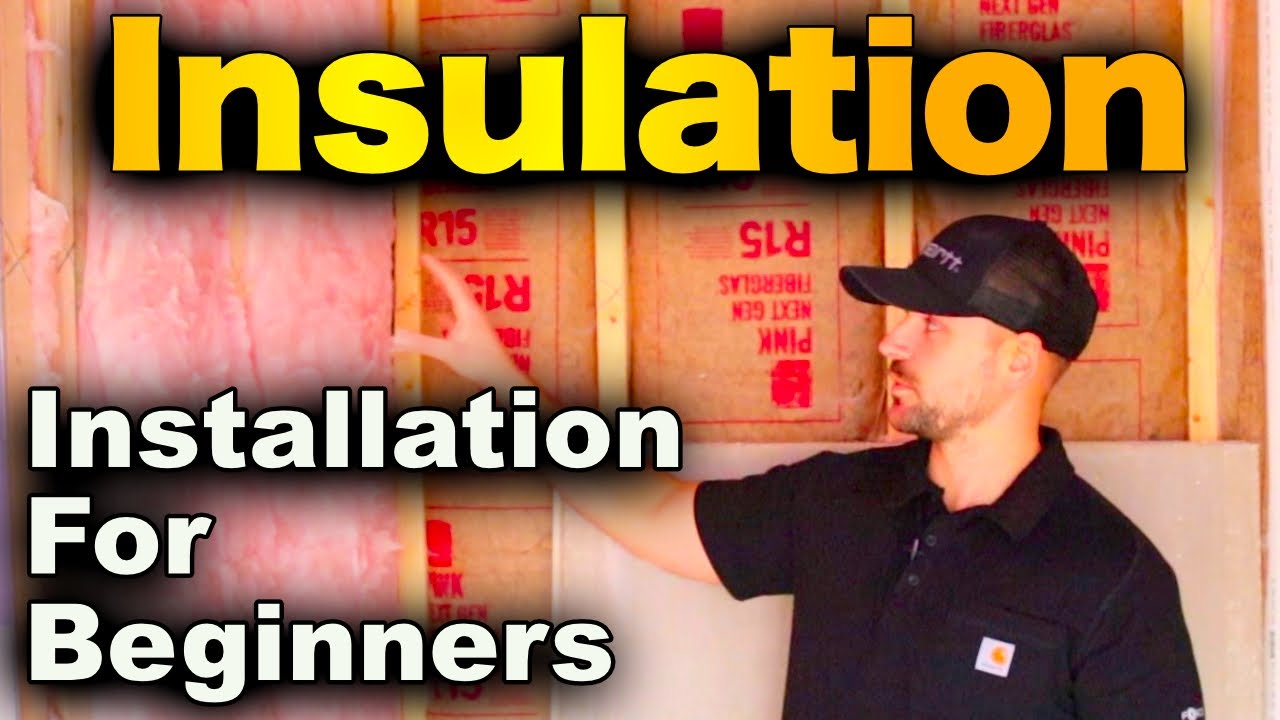
1. Insulation Material Selection and Planning
Choose the appropriate insulation materials based on the building’s climate zone, wall assembly type, and performance goals. This crucial planning phase establishes the thermal performance that will affect comfort and energy costs for decades.
- R-value requirements: Select insulation with proper R-values based on climate zone (R-13 to R-21 for walls, R-30 to R-60 for attics) according to IECC standards
- Material comparison: Evaluate options including fiberglass batts (R-2.9 to R-3.8 per inch), mineral wool (R-3.0 to R-3.3 per inch), spray foam (R-3.7 to R-6.5 per inch), and cellulose (R-3.2 to R-3.8 per inch)
- Vapor barrier strategy: Determine appropriate vapor retarder placement based on climate (interior-facing in cold climates, exterior-facing in hot-humid climates) to prevent moisture accumulation
2. Air Sealing and Envelope Preparation
Seal air leakage points and prepare the building envelope before insulation installation. Air sealing can be more important than insulation itself, as it prevents conditioned air loss and moisture migration through the building assembly.
- Critical junction sealing: Apply caulk or spray foam at top/bottom plates, around window/door rough openings, and at penetrations, targeting maximum 3 ACH50 (air changes per hour at 50 Pascal pressure)
- Recessed fixture treatment: Install air-tight IC-rated (insulation contact) fixtures or build sealed boxes around non-IC fixtures, maintaining minimum 3″ clearance from insulation
- Rim joist insulation: Seal rim joists with 2″ closed-cell spray foam (minimum R-10) at foundation/floor transitions to prevent major air leakage at these vulnerable points
3. Wall and Ceiling Insulation Installation
Install insulation in walls, ceilings, and floors to enhance thermal efficiency and reduce energy costs. Proper installation technique is as important as the insulation material itself for achieving rated R-values.
- Batt installation: Install batts with full contact against all six sides of cavity, cut precisely to fit around obstructions, with no compression or gaps exceeding 2% of insulated area
- Blown insulation application: Install loose-fill to proper density (minimum 1.5 lbs/cubic foot for cellulose) with depth markers every 300 sq ft to verify consistent coverage
- Spray foam application: Apply at proper temperature range (65°F-85°F surface temp) with 2″ maximum thickness per pass for closed-cell and 5″-6″ per pass for open-cell to prevent improper curing
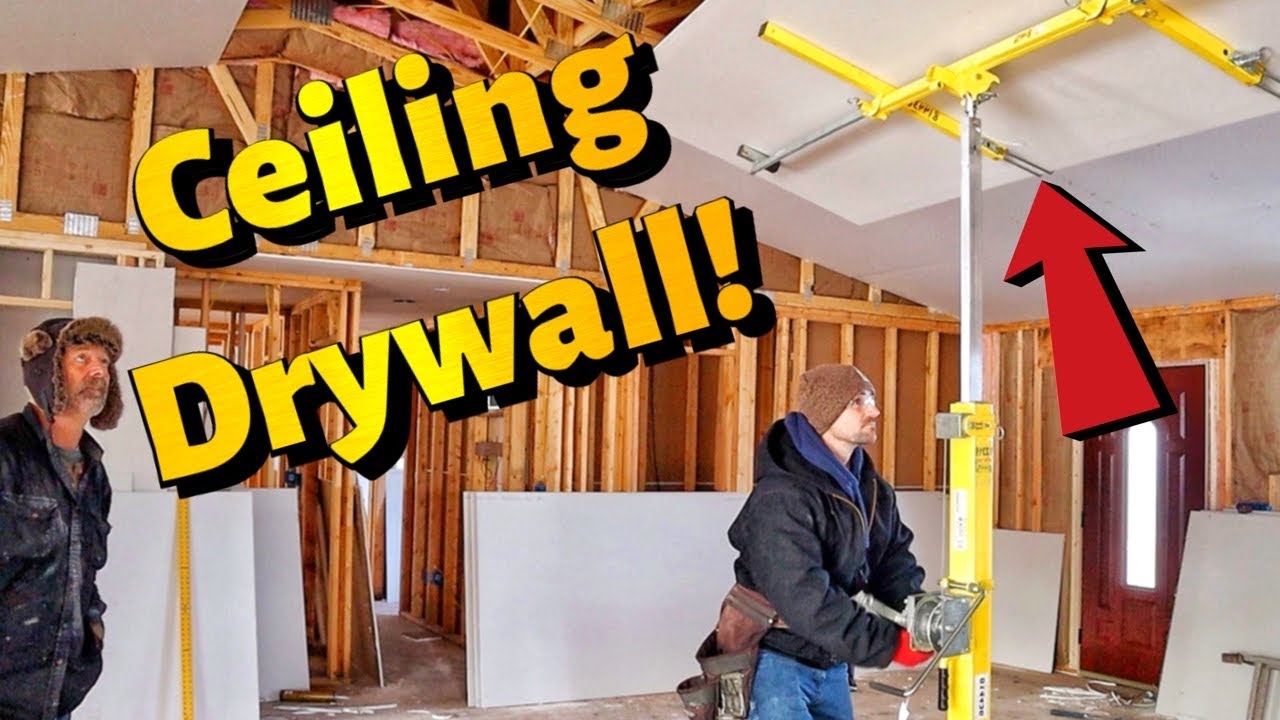
4. Drywall Layout and Hanging
Secure drywall sheets to the structural framework, ensuring proper alignment and fit. The hanging phase establishes the foundation for smooth, seamless finished walls that will influence the entire interior appearance.
- Drywall selection: Use 1/2″ drywall for walls (5/8″ for fire-rated applications), with moisture-resistant (MR) or fiber-reinforced panels in bathroom wet areas
- Layout strategy: Plan horizontal sheets with tapered edges meeting at 48″-54″ height, staggering vertical seams by minimum 16″, and avoiding four-corner intersections
- Fastener spacing: Install screws at 12″ on center for ceilings, 16″ for walls, set 3/8″ below surface without breaking paper face, minimum 3/8″ from edges
5. Taping and Mudding
Apply joint compound and tape over seams and screw holes to create a smooth, continuous surface. Proper taping technique creates walls that appear seamless under various lighting conditions and finish types.
- Tape application: Embed paper tape (not mesh for flat joints) in 3″-4″ bed of all-purpose compound, with proper feathering 8″-10″ wide from center of seam
- Corner treatment: Install metal or paper-faced metal corner bead on outside corners, secured every 8″, with three progressively wider coats of compound
- Coating sequence: Apply three separate coats (tape coat, fill coat, finish coat), allowing 24 hours drying time between applications in normal conditions
6. Finishing and Texturing
Sand, texture, and prime the drywall, preparing it for painting or other final finishes. The quality of finishing determines whether drywall installation appears professional or amateurish under normal lighting.
- Sanding technique: Use 150-220 grit sandpaper with light pressure, feathering edges 12″-16″ from seam center, with pole sander for ceilings and hand sanding for detail work
- Texture application: Apply consistent texture (orange peel, knockdown, or smooth) using proper pressure (25-30 PSI for orange peel) and technique for uniform appearance
- Corner treatment: Use special attention at inside corners, creating crisp, straight lines with specialized corner tools and light sanding
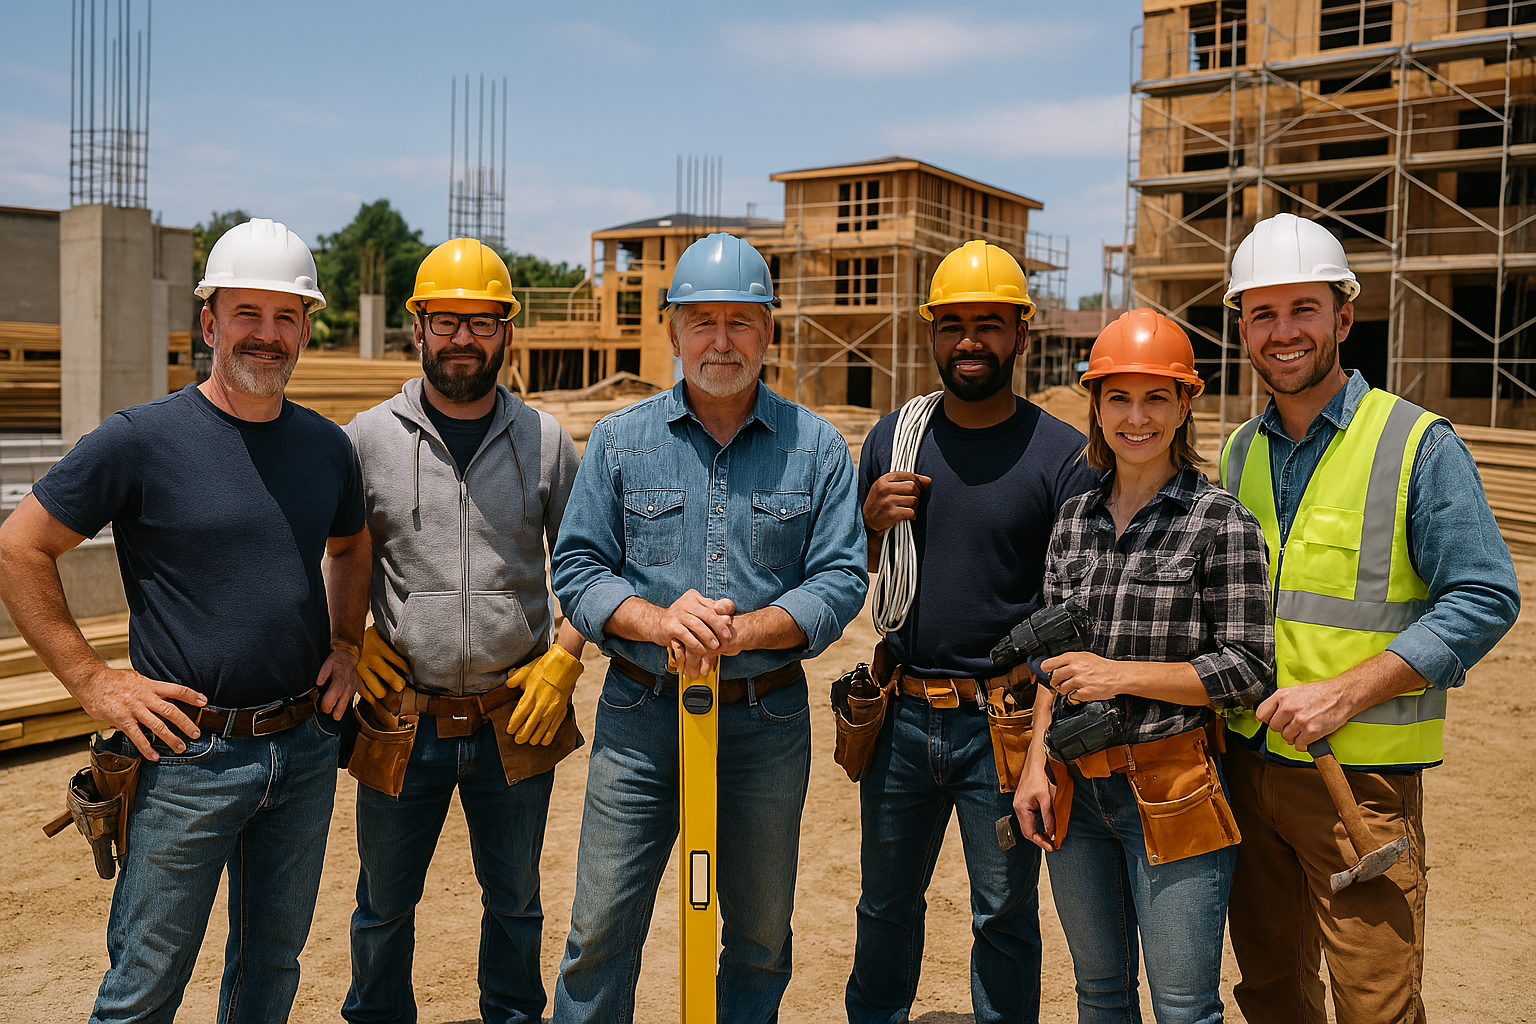
Who Handles Insulation and Drywall Installation?
These installations require specialized professionals with proper training and experience:
- Insulation Contractor: Specializes in thermal envelope systems with knowledge of building science principles, vapor control, and air sealing techniques for maximum energy efficiency
- Energy Auditor: Evaluates building envelope performance using blower door testing and infrared imaging to identify thermal weaknesses and verification of air sealing effectiveness
- Drywall Hanging Crew: Skilled specialists who measure, cut, and install drywall panels with precision, creating the framework for seamless walls and ceilings
- Taping and Finishing Specialists: Highly skilled artisans who apply joint compound, tape, and textures to create smooth, flawless wall surfaces that appear continuous
- Acoustic Ceiling Installer: Installs specialty ceiling systems including acoustic panels, coffered ceilings, or specialty designs requiring specific expertise
- Building Inspector: Verifies that insulation meets energy code requirements and that fire-rated assemblies are properly installed according to design specifications
Time & Cost Estimates
The timeline and budget for insulation and drywall installation vary based on project size, material selection, and finishing complexity. Here are detailed estimates for each major phase:
| Installation Component | Estimated Time | Estimated Cost | Key Value Points |
|---|---|---|---|
| Material Selection & Planning | 1–2 days | $500–$1,800 | Ensures optimal thermal performance for specific climate |
| Air Sealing & Preparation | 1–3 days | $800–$2,500 | Prevents air leakage that can reduce efficiency by 30% |
| Insulation Installation | 2–5 days | $2,500–$8,000 | Creates thermal barrier for energy savings and comfort |
| Drywall Hanging | 2–4 days | $2,000–$6,000 | Establishes the base for interior wall finishes |
| Taping & Mudding | 3–5 days | $1,800–$4,500 | Creates seamless appearance between panels |
| Finishing & Texturing | 2–3 days | $1,200–$3,500 | Provides final surface preparation for paint/wallpaper |
| Total Estimates | 11–22 days | $8,800–$26,300 | Complete thermal and interior wall system |
These cost estimations provide a general guideline and cover a range from basic to mid-tier builds. They may not reflect costs for high-end or luxury projects. For more precise estimates, consult with professionals based on your specific requirements.
Hidden Insulation & Drywall Costs That Can Destroy Your Budget
Here’s what contractors don’t mention in their initial quotes—costs that hit 67% of insulation/drywall projects:
The “Surprise” Cost List:
| Hidden Cost | Typical Range | How to Avoid/Minimize |
|---|---|---|
| Moisture Remediation Found mold/water damage behind walls |
$3,000–$15,000 | Inspect with moisture meter before closing walls |
| Electrical/Plumbing Fixes Code violations discovered during insulation |
$2,000–$8,000 | Pre-insulation inspection by electrician/plumber |
| Sound Insulation Upgrades “Why can I hear everything?” |
$1,500–$5,000 | Plan acoustic insulation from start, not after |
| Level 5 Finish Requirements Dark paint/critical lighting shows everything |
$0.50–$1.00/sq ft | Specify finish level in contract upfront |
| Spray Foam Overspray Cleanup on windows, floors, HVAC |
$2,000–$6,000 | Demand professional masking, photo everything |
| HVAC Modifications Ducts in wrong place after insulation |
$1,500–$4,000 | Coordinate HVAC layout before insulation |
| Texture Matching Patches don’t match existing texture |
$1,000–$3,500 | Save texture sample, hire same contractor |
| Disposal Fees Old insulation is hazardous waste |
$800–$3,000 | Get disposal quote separately, compare |
Insulation & Drywall Disasters: Real Stories, Real Lessons
Learn from these expensive mistakes—actual horror stories from insulation and drywall projects:
⚠️ The $65,000 Spray Foam Nightmare
Location: Denver, Colorado | Loss: $65,000 + uninhabitable for 6 months
Contractor sprayed foam at wrong temperature ratio. Result: off-gassing that wouldn’t stop. Family hospitalized, entire foam system had to be removed and replaced. House smelled like fish for months.
- Installer certification from foam manufacturer
- Temperature logs during application
- 24-hour ventilation plan post-spray
- Get samples tested if ANY odd smell
⚠️ The Wrong Vapor Barrier Mold Farm
Location: Seattle, Washington | Loss: $85,000 + health issues
Contractor installed vapor barrier on wrong side in mixed climate. Moisture trapped in walls for 2 years. Black mold throughout, drywall falling off, studs rotting. Insurance denied claim – “installation error.”
- Cold climates: vapor barrier INSIDE
- Hot humid: vapor barrier OUTSIDE
- Mixed climates: NO vapor barrier or smart membrane
- When in doubt: hire building science consultant
⚠️ The Drywall Ceiling Collapse
Location: Phoenix, Arizona | Loss: $35,000 + crushed furniture
5/8″ drywall on 24″ centers with blown insulation above. Installer used 1-1/4″ screws instead of 1-5/8″. Two years later, master bedroom ceiling crashed down at 3 AM. 800 lbs of drywall and insulation.
- 24″ centers = 5/8″ drywall MINIMUM
- Screws must penetrate framing 1″ minimum
- 12″ spacing on ceilings, not 16″
- Double-check with 30 lbs insulation above
⚠️ The Soundproofing That Wasn’t
Location: Nashville, Tennessee | Loss: $42,000 + marriage stress
Couple paid extra for “soundproof” home theater. Contractor used regular insulation, single drywall layer. Could hear movies throughout house. Divorce papers cited “construction stress” as factor.
- Rockwool or specific acoustic insulation
- Double drywall with Green Glue
- Staggered or double stud walls
- Acoustic caulk at ALL gaps
Insulation & Drywall Money-Saving Secrets From 30-Year Contractors
Contractors hate when homeowners know these tricks—but here they are:
🎯 Timing = Everything
Best Times to Schedule (20-35% Savings):
- Insulation: Summer in cold climates (contractors desperate)
- Drywall: December-January (slow season everywhere)
- Avoid: Spring/Fall when everyone’s building
- Sweet Spot: Right before holidays = deep discounts
Real Example: Same 2,500 sq ft job: October quote: $12,500 | January quote: $8,200
💰 Material Hacks That Save Thousands
- Buy Your Own Insulation: Contractor markup is 40-60%. Order from supply house
- Drywall Delivery Direct: $0.28/sq ft vs $0.45 from contractor
- Mix Insulation Types: Spray foam critical areas + batts elsewhere = 40% savings
- “Leftover” Drywall: Yards sell returns at 50% off – perfect for small rooms
- Bulk Buy With Neighbors: Truckload pricing = 25% discount
🔨 Strategic DIY (Save $3,000-8,000)
| You CAN DIY This | Savings |
|---|---|
| Air sealing before insulation | $1,500-2,500 |
| Attic insulation (batts/blown) | $2,000-4,000 |
| Drywall removal/demo | $1,000-2,000 |
| Prime/paint after drywall | $1,500-3,000 |
⚠️ NEVER DIY: Spray foam, ceiling drywall, or Level 5 finishing
🎪 Smart Negotiation Tactics
- “Cash Price”: Offer cash payment = instant 5-10% discount
- Off-Hours Work: Let them work evenings/weekends = 15% off
- Skip the Texture: Smooth walls yourself = save $0.50/sq ft
- “Training Job”: Let them train new guys on your garage = 30% off
- End of Quarter: Large companies need numbers = 20% discounts
Future-Proof Your Insulation & Drywall: Plan Now, Save $30,000+ Later
Smart builders prepare for future needs while walls are open. Here’s what to install NOW:
🏠 Smart Home & Technology Infrastructure
Install NOW for $500-1,500 | Retrofit LATER for $5,000-15,000
- Run CAT6/fiber conduit to every room (even if not using yet)
- Install backing plates for future TVs/monitors
- Add electrical boxes for future smart switches
- Pre-wire for motorized blinds (just run the wire)
- Speaker wire loops in ceilings for future audio
💡 Smart Move: Install 2″ conduit from basement to attic. Future-proof for ANY cable needs. Cost now: $200. Cost later: $2,000+ and holes in walls.
🎬 Home Theater & Sound Isolation
Prep the bones now—finish later when budget allows
- Double Wall Framing: Add second wall frame now ($800) vs demo later ($5,000)
- Ceiling Isolation Channels: Install before drywall ($400) vs ceiling rebuild ($3,000)
- In-Wall Speaker Boxes: Frame them now, cover with drywall, cut out later
- HVAC Silencers: Add baffles while walls open ($200) vs impossible later
⚡ Future Energy Upgrades
- Solar Conduit: Run from attic to electrical panel ($150 now vs $1,500 later)
- EV Charger Prep: 50-amp wire to garage while walls open
- Battery Backup Space: Frame closet for future Tesla Powerwall
- Extra Insulation Space: Use 2×6 walls even if insulating as 2×4 (add more later)
🏗️ Future Room Conversions
| Future Conversion | Prep Now | Cost Now vs Later |
|---|---|---|
| Basement to Living Space | Frame walls, run HVAC ducts | $2,000 vs $8,000 |
| Attic to Bedroom | Reinforce floor, add collar ties | $3,000 vs $12,000 |
| Garage to ADU | Insulate now, add plumbing sleeves | $4,000 vs $15,000 |
| Office to Bedroom | Add closet framing, egress planning | $500 vs $3,000 |
🌡️ Health & Comfort Infrastructure
- ERV/HRV Ducts: Run ventilation paths while walls open
- Radon Mitigation: Install pipes now, activate if needed
- Humidity Control: Frame for future dehumidifiers
- Air Purification: Install backing and power for units
⚠️ Document EVERYTHING Behind Walls!
Before closing up walls, take photos of:
- Every stud bay with wiring/plumbing visible
- Insulation installation (for warranty claims)
- All backing plates and future connection points
- Measurements from corners to hidden features
Create a “wall map” PDF. Worth its weight in gold for future work!
Insulation & Drywall Cost Calculator: Get Real Numbers
Stop getting shocked by quotes. Here’s what insulation and drywall ACTUALLY cost:
Quick Cost Estimator by House Size & Finish Level
| House Size | Basic (R-13 walls, Level 3) |
Standard (R-19 walls, Level 4) |
Premium (Spray foam, Level 5) |
|---|---|---|---|
| 1,500 sq ft | $6,000-8,500 | $9,000-13,000 | $15,000-22,000 |
| 2,000 sq ft | $8,000-11,000 | $12,000-17,000 | $20,000-28,000 |
| 2,500 sq ft | $10,000-14,000 | $15,000-21,000 | $25,000-35,000 |
| 3,000 sq ft | $12,000-16,500 | $18,000-25,000 | $30,000-42,000 |
Cost Multipliers (Add These):
- Cathedral Ceilings: Add 25-40% for difficult access
- Old House Retrofit: Add 30-50% for irregular framing
- Soundproofing Package: Add $2-4/sq ft for acoustic treatment
- Fire-Rated Assemblies: Add 20-30% for Type X and proper sealing
- Tight Timeline: Add 25-50% for overtime/extra crews
Breakdown by Component:
| Component | Cost per Sq Ft | 2,000 sq ft House |
|---|---|---|
| Fiberglass Batts (R-19) | $0.50-0.80 | $1,000-1,600 |
| Blown Cellulose | $0.80-1.20 | $1,600-2,400 |
| Closed-Cell Spray Foam | $1.50-3.50 | $3,000-7,000 |
| Drywall Hang Only | $0.40-0.60 | $800-1,200 |
| Tape & Finish (Level 4) | $0.80-1.50 | $1,600-3,000 |
| Texture Application | $0.30-0.60 | $600-1,200 |
💡 Use Our Interactive Task Pages!
Track every cost and milestone with our step-by-step insulation and drywall checklist. Never miss critical details like vapor barriers or acoustic requirements.
→ Access Insulation & Drywall Task ChecklistInsulation & Drywall Q&A: Your Questions Answered
Here are the questions every homeowner asks (but contractors hope you don’t):
Q: “Is spray foam really worth 3x the cost of fiberglass?”
A: Depends on your situation. YES if: you have irregular framing, need air sealing desperately, or live in extreme climates. NO if: you have standard framing and can air seal properly. The truth: 2″ of closed-cell foam + fiberglass often gives 90% of the benefit at 60% of the cost. Full spray foam makes sense for crawl spaces, rim joists, and problem areas—not necessarily whole houses.
Q: “Why do I see nail pops after 6 months?”
A: Wood framing shrinks, drywall doesn’t. It’s physics, not poor workmanship (usually). Expect 10-20 nail pops in year one. The fix: wait a full year, then fix them all at once. Use screws 2″ away from pops, remove the nail, patch, and paint. Doing it too soon = they come back. Pro tip: insist on screws, not nails, during installation.
Q: “Can I mix insulation types in the same wall?”
A: YES, and it’s often smart! “Flash and batt” uses 1-2″ of closed-cell spray foam for air sealing, then fiberglass for the rest. Saves 40-50% over full spray foam. Also works: rigid foam board against sheathing + batts. NEVER mix with air gaps between—that creates convection loops that destroy R-value.
Q: “How smooth does drywall really need to be?”
A: Depends on your paint and lighting. Level 3 (basic): fine for textured walls or flat paint in bedrooms. Level 4 (standard): needed for eggshell/satin paint in living areas. Level 5 (premium): REQUIRED for dark colors, gloss paint, or critical lighting (kitchens, baths). Skip Level 5 to save money? Every flaw shows. Penny wise, pound foolish.
Q: “My contractor says R-values don’t matter, air sealing does. True?”
A: Half true. Air leaks can reduce insulation effectiveness by 50%, so yes, air sealing is critical. BUT you need both. Think of it like a winter coat: thickness (R-value) keeps you warm, but if it’s unzipped (air leaks), you’re still cold. Prioritize: 1) Major air leaks, 2) Adequate R-value, 3) Minor air sealing. Budget 20% for air sealing.
Q: “Can I hang drywall myself but hire pros for finishing?”
A: Technically yes, but most finishers charge 25-50% MORE to fix DIY hanging. Why? Your joints won’t be tight, screws will be wrong depth, and cuts will be rough. This creates 2x the finishing work. If you DIY: rent a drywall lift ($40/day), use a screw gun with depth setting, and watch 10 hours of YouTube first. Still cheaper to hire pros for the whole job.
Best Time for Insulation & Drywall Work (Save 20-40%)
Temperature and humidity matter MORE than you think. Wrong timing = failed installation:
| Region | BEST Months (Save Money) |
OK Months (Normal Price) |
AVOID (Problems/Premium) |
Why It Matters |
|---|---|---|---|---|
| Northeast US | May-Jun, Sep-Oct | Apr, Nov | Dec-Mar, Jul-Aug | Mud/heat won’t cure below 55°F or above 90°F |
| Southeast US | Nov-Mar | Apr, Oct | May-Sep | 90% humidity = drywall never dries properly |
| Pacific NW | Jul-Sep | Jun, Oct | Nov-May | Rain = moisture in insulation, mold risk |
| Southwest US | Oct-Apr | May, Sep | Jun-Aug | Extreme heat = rapid drying, cracks everywhere |
| Midwest US | May-Jun, Sep-Oct | Apr, Nov | Dec-Mar, Jul-Aug | Freezing = burst pipes in walls, failed mud |
| Mountain West | Jun-Sep | May, Oct | Nov-Apr | Low humidity = special additives needed |
🌡️ Critical Temperature Rules:
Spray Foam Temperature Requirements:
- Surface temp: 65-85°F (outside this = off-gassing)
- Material temp: Must be 70-80°F for 24 hours before
- Post-spray: Maintain 70°F+ for 48 hours minimum
- Cold spray: Won’t expand properly, R-value cut in half
Drywall Mud Rules:
- Minimum temp: 55°F for 48 hours after each coat
- Ideal humidity: 40-60% (too dry = cracks, too wet = won’t cure)
- Between coats: 24 hours @ 70°F, 48 hours @ 55°F
- Forced drying: Fans/heat = guaranteed cracks and failure
⚠️ NEVER: Install in unheated space in winter, rush drying with heaters, or ignore manufacturer temp specs. One frozen night = redo entire job.
Cost-Saving Tips
Optimize your insulation and drywall investment with these expert strategies:
- Strategic insulation allocation: Invest in higher R-value materials for attics (greatest heat loss area) while using standard insulation for walls, optimizing thermal performance without increasing total costs by 15-20%
- Hybrid insulation approach: Use spray foam at critical air sealing points (rim joists, penetrations) combined with less expensive batt insulation for general areas, achieving 90% of spray foam performance at 60% of the cost
- Larger drywall sheets: Use 54″ wide or 12′ long sheets where possible to reduce the number of seams by 25-30%, decreasing finishing time and material usage
- Two-coat finish system: Consider using setting-type compound for first coat and lightweight all-purpose for second coat, eliminating the need for a third coat in non-critical areas
- Strategic scheduling: Coordinate insulation and drywall installation during off-peak seasons when contractors offer 10-15% discounts to fill schedule gaps
- Material waste reduction: Create detailed take-offs and optimize panel layouts to minimize cuts and waste, potentially saving 8-12% on material costs
Related Construction Guides
Continue your construction journey with these essential guides:
Framing Guide
Must read BEFORE insulation. Learn proper framing for insulation depths and drywall backing.
Read More →Electrical Wiring
Coordinate electrical before closing walls. Avoid costly mistakes with box placement.
Read More →Painting & Finishes
Your next step after drywall. Learn which paints need Level 5 finish.
Read More →Interior Carpentry
Install trim after drywall. Learn proper sequencing and moisture control.
Read More →Roofing & Attic
Attic insulation is different. Learn ventilation requirements and moisture control.
Read More →Complete Build Process
See where insulation and drywall fit in the complete construction sequence.
Read More →Summary: Your Insulation and Drywall Action Plan
1. Prioritize Air Sealing Before Insulation
Focus on comprehensive air sealing of all penetrations, gaps, and transitions before installing insulation. Even small air leaks can dramatically reduce the effective R-value of insulation and compromise the thermal envelope’s performance.
2. Select Materials Appropriate for Your Climate
Choose insulation R-values and vapor barrier strategies specifically designed for your climate zone. The wrong approach can trap moisture within walls, while the right strategy optimizes both comfort and long-term durability.
3. Invest in Quality Drywall Finishing
Allocate sufficient time and resources for professional drywall finishing, as this visible element affects the perceived quality of your entire project. Proper taping, mudding, and sanding create walls that appear seamless even under challenging lighting conditions.
Proper insulation and drywall installation forms the foundation of your building’s comfort, energy efficiency, and interior aesthetics. Following these professional guidelines ensures that your walls will provide decades of performance while maintaining their appearance.
Complete Your Insulation and Drywall Project With Confidence
Track Your Progress: Monitor your insulation and drywall milestones with our interactive tools
Stay Notified: Receive alerts for material deliveries, inspection schedules, and drying time requirements
Step-by-Step Guidance: Follow detailed instructions on air sealing, insulation installation, and drywall finishing techniques
Reduce Stress: Keep all specifications and inspection records organized in one secure location
Whether you’re building a new structure or renovating existing spaces, professional insulation and drywall installation are essential for energy efficiency, comfort, and interior aesthetics. Explore our Step-by-Step Builds, Step-by-Step Buys, and Step-by-Step Invest resources for more expert guidance.
When building your own home, always do your due diligence. Consult the professionals you’ve hired—such as your architect, subcontractors, or engineers—and confirm that your work complies with all local building codes and inspections required in your country, state, or province. Builds and Buys is for educational purposes only. Always verify with licensed professionals.
How to Drywall a House (Professional Crew)
In this Building a House From Start to Finish Episode we hire a drywall crew to come in and drywall our entire house. We document the entire process and provide the step by step process and tools you will need if you are doing this on your own. We split up the process into three phases: 1. Hanging the Drywall 2. Taping & Mudding the Drywall 3. Sanding the Drywall. For each phase we break down the process until we have our own fully drywalled house!
Check out more informative Videos

How to Choose and Install Insulation | How To Anything
Not all insulation is made the same, but which one should you use? Depending on your needs, Taylor will walk you through the 4 main types of insulation, fiberglass batts, foam panels, spray foam, blown-in-insulation, and the best applications for each.
Check out more informative Videos

Knowledge Quiz: Insulation and Drywall Installation
Open Quiz
5 quick questions - see how much you learned!
1) According to the guide, proper insulation and drywall installation can reduce energy costs by what percentage?
Answer: B
The introduction states that "Research shows that proper installation can reduce energy costs by 20-30% and increase property value by up to 6%."
2) What is the recommended R-value range for attic insulation according to the guide?
Answer: A
The "Insulation Material Selection and Planning" section specifies "Select insulation with proper R-values based on climate zone (R-13 to R-21 for walls, R-30 to R-60 for attics)."
3) What is the recommended screw spacing for drywall installation on ceilings?
Answer: C
The "Drywall Layout and Hanging" section states "Install screws at 12″ on center for ceilings, 16″ for walls."
4) What contingency percentage does the guide recommend budgeting for insulation and drywall projects?
Answer: D
The "Hidden Insulation & Drywall Costs" section includes the PRO TIP: "Add 20-25% contingency to insulation/drywall budgets. Walls are where all the previous trades' mistakes get discovered."
5) How many coats of joint compound should be applied during the taping and mudding process?
Answer: B
The "Taping and Mudding" section specifies "Apply three separate coats (tape coat, fill coat, finish coat), allowing 24 hours drying time between applications in normal conditions."
News And Knowledge
Stay informed with the latest trends, insights, and updates in the real estate world.